Feeds:
Posts
Comments

Noro and Tweed: Blocking

This is kind of a surprise project…

I wasn’t sure about the yarn combo – now I love it.

I wasn’t sure about the style – now I love it.

I wasn’t sure about the techniques – they worked like a charm.

I wasn’t sure about the sleeves – they are charming in a Jedi sort of way.

I have nothing to wear it with – but I love it anyway!!

I can’t wait to show you this as soon as it’s dry!

Whooo’s there?

It’s amazing how fast life catches up with you, isn’t it?

First and foremost I want to thank everyone who purchased my pattern – you guys rock! I hope you enjoy knitting it as much as I enjoyed designing it!

Anyway, my boys and I went away for a simple weekend, and it’s taken me nearly 3 weeks to pull myself back together. I always tell myself “I’ll blog about this project, as soon as I get good pics.” Well by the time the daylight photo-op arrives I’m already engrossed in a new project and too busy to take pictures of FOs. Does that ever happen to you?

There was the new spinning wheel… five new skirts… a February sweater… dying and spinning… all un-photographed.

Finally though I took some pictures of the latest FO: an Owl Cardigan for Gabriel

This is the most rewarding thing I’ve knit in a long time, probably because Gabriel is a perfect recipient – he loves him some woolies. And he’ll ham for the camera, that’s always nice.

This morning we walked to Jo-ann together to buy the zipper, and I could not sew it in fast enough when we got home!

Knitterly details:

Pattern: I knit this off an old Owl Cardigan knit by my grandmother close on 30 years ago. You can see the original here.

Gabriel loved the little owl sweater so much that I took the pattern from the original and made him a new one. Most likely I’ll be making another in a few years. Anyway…

Yarn is Silky Wool, 2 less than skeins each blue and brown, less than 1 white. Stripes because I’m on a major yarn diet (did I mention the new spinning wheel?) US sz. 6 needles, I didn’t check gauge.

Construction: The original was knit in pieces and seamed together. I knit this one back-and-forth seamlessly. I tried to stay as close to the original as possible: raglan shoulder shaping, folded over ribbed collar, zipper.

Verdict: I would try to make the ribbing match next time, the brown collar is ok, but I wish it could have matched. However, Gabriel loves it – I finished it at 10am and he didn’t take it off until bedtime. That’s a winner in my book.

Later dudes.


Ocean Waves

Happily Introducing: The Ocean Waves Pullover

I designed this for a little boy who loves sea turtles. After designing the cables I was so charmed by the result that the turtle no longer seemed necessary!

The pattern is for sale now for $5.00 through Paypal. Click the link in the right hand column to purchase the PDF.  Now available to Ravelry members in my Ravelry Shop.

The focus of this pattern is the cable waves chart, as lateral cables are pretty unique. The pattern also includes basic instructions for a seamless pullover in multiple sizes and gauges- from baby to large adult.

The cable can be adapted to any size or application – sophisticated at finer gauges, whimsical in chunky yarns. The Wave cables sit atop a “sea” of reverse stockinette, above is a smooth stockinette “sky.”

Serious knitting has been put on temporary standby – I’ve been a little distracted with all the other fibery pursuits…

There has been spinning – 2 skeins of Merino, in varying weights.

There’s been carding and more spinning.  I was playing around with blending colors in the carder. This is fiber from a black alpaca – IttyBit, and a white alpaca – Franchesca.  The black fiber was very hair-like, and the white very downy so I hoped they would balance each other out.

The resulting yarn is very fuzzy, but quite soft.  I spun the single very gently, then added lots of twist during plying.  The final product is very strong and dense, and like most 100% alpaca yarns, rather heavy for it’s diameter.

Still not sure what I’ll do with this stuff. The black is not soft enough to wear on the skin, but it could make a sturdy outerwear fabric.

And finally there’s been dyeing. KnitPicks Bare fingering weight, handdyed in the Crockpot.  Love how this came out.

Knitting next time.

The Lace Bug Bites

This was the first fiber to come off the drum carder – I had this stuff dyed and ready for the moment the carder arrived at our house.

It’s some lovely soft alpaca fiber from Franchesca of Alpacas at Tucker Creek. 18.8 microns! Love!

It spun up into some very soft and fine 2 ply laceweight. That pic’s color is really off, it’s much pinker.

I only dyed 30 gms, which spun into 256 yds, not enough for a large lace project but perfect for a light airy scarf.  Tiennie just posted instructions for a very simple feather and fan scarf and it seemed like the perfect match for this yarn.  I took out one pattern repeat because I have so little yarn, but it should block to about 7 inches in width.

That’s a pretty accurate color.

I’m off to knit some more!

Greta Rose

Skip the twaddle and check it on Ravelry

Pattern: Printzess by the Berroco Design Team, found in the Berroco Comfort booklet #269

Yarn: Berroco Comfort, 1 skein each Dutch Teal, Kidz Green, Bitter, Primary Red, Cornflower, and 2 skeins Turquoise.

Needles and Gauge: US sz. 6 / 4mm – yielding 5 stitches per inch.

Recipient: Miss Greta Rose – a classmate of Nikolai’s and a balletmate of Gabriel’s. Big sister of this sweater.

Time Frame: Started April 16, 2008 – Finished April 28, 2008

Now on to the interesting stuff.

Modifications: Do you really need to ask? I made it in the round, and seamless. I steeked the front. Worked a V-neck instead of the U-neck. Got rid of the ruffles on the sleeves and bottom. Knitted the button band instead of crocheting. Added length to the body. Tweaked the shaping a bit so the bottom would bell slightly.

And now after my pig-headed destruction of this design I get to cut myself a large slice of humble pie and say: You folks at Berroco know what you are doing. I should have followed your pattern a little better. Forgive my blatant disregard of your advice and instructions.

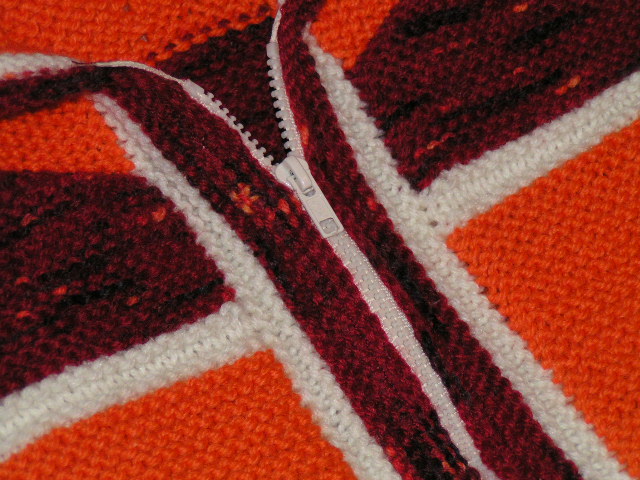
For you see, this yarn was is an acrylic/nylon blend. It is multistranded and works up into a soft, smooth supple fabric. It is not wool. It is not meant to be steeked. I reinforced the steek with 2 lines of machine stitching, and 2 lines of crochet, and I’m still worried. Pray it holds.

Lets move on to more positive things.

I love the flowers. Ok, the embroidery skillz need some work, but the flowers are so cute. I was astonished with how the flowers really pulled the sweater together. Before the flowers were on I did not like the sweater at all – then hey presto! It was a magical transformation to have all the colors and sections tied together.

The red button band. I love red trim. When I have my own house I want it to have a red door – I’m just weird that way. Anyway, garter stitch band, 45 deg. miter at the V-neck. Cast off in knit on the right side (sorry EZ). Buttons from Jo-ann.

But, why, you ask, is there a line of Vs inside the buttonband?? Again, Knitter Peggy got a little carried away with her wool habits and when picking up stitches for the buttonband huge holes appeared. Not something that could be strategically felted, so I had to slip stitch crochet around each stitch I picked up to secure the band and cover the holes.

Really, it’s just another design detail. 🙂

Buttonloops cast-off.  Cast-off the the desired spot, chain 4, continue to cast-off twisting the 1st stitch after the button loop.

Surely I’m not the first to unvent this technique but I’ve never seen it before.  I really like it, and I’ll probably use the technique again.

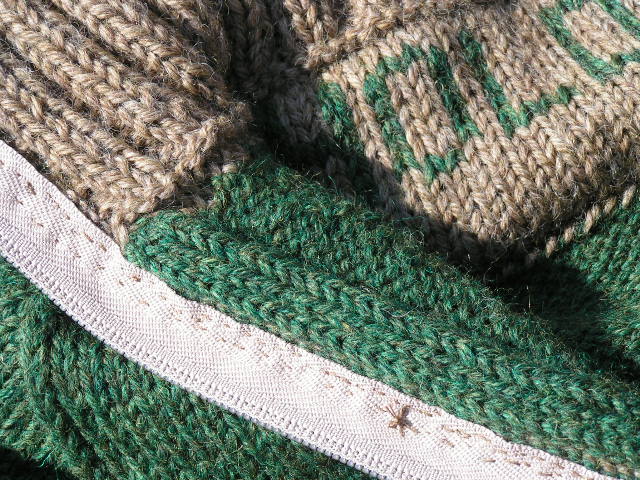
A name tag and the extra button. I like to sew girls’ name tags inside the button band, in this case, on the steek facing. This is mostly to discourage kids from hanging handknits by the neck, and because grosgrain ribbon on the neck might be a bit scratchy.

The inside. This picture cannot express the ordeal of dealing with ends. They were copious and bred like bunnies every time I finished one off. Fortunately for me with my steek all the body ends were secured by machine and hidden in the facings. (Hey Berroco, maybe I am smarter than you!)

The sleeves however were a nightmare. Aside from the ends with no hiding places I had another problem… Again, Knitter Peggy with her wool habits thinks that a 5 stitch float on the back of the work is no big deal. And with wool, it’s not. However, as the pattern clearly states, colors must be twisted together frequently.

This yarn like small fingers – even small fingers in fists.

After identifying a very bad case of finger-snag, I had to go back and tack down every single float in the sleeves. The price to pay for idiocy. (Ok, Berroco you’re smarter than me.)

End of odessey.

Verdict: The result is fantastic. BUT, I would think very seriously before knitting this again. General note to self: I do not like multistrand yarns.

Aside from learning a few new techniques, I learned a lot about my knitting habits and assumptions. So it was a good experience, all in all. I just hope that steek holds!

…Would FrayCheck hold a steek?

Odds and Ends

That title is just a sneaky way of saying “I don’t have time to write a full post tonight, but I need to post something before things get out of hand.”

So without further ado:

I got a drum carder for my birthday.  This is the Louet Jr. and it is fantastic.  Love Love Love it.  I would recommend it to anyone in the market for a drum carder, the batts are huge and light and fluffy, and you can card an unreal amount of fiber at one time.  Wonderful to spin from.

Advertising— This was ordered from HelloYarn, best price on the internet. —Thank You Adrian

The girl-y sweater is proceeding nicely.  I hate the green which ended up being very neon, but it will hopefully mellow out a bit when I get all the flowers embroidered on.  It should be finished by Monday- with a complete post.

I knit a Ribwarmer (here on Ravelry) The girly sweater was driving me batty, mindless garter stitch therapy was in order. This is an end of 2 years gift for one of Nikolai’s preschool teachers – she is slightly shorter and thicker than I am, so it should fit well.

My dad and I went golfing with the boys today.  It was their first time playing on a real course, and they had a blast.  Above is Nikolai with his impeccable form – consistently driving the ball upwards of 70 yards.

Below is Gabriel, who hasn’t much technique yet – but he sure had fun!


FO: The Boy Bog Jacket

Pattern: The Bog Jacket by Elizabeth Zimmermann, found in Knitting Around  Here on Ravelry

Knit for: Tyler – Mr. Maroon Fishtrap Twin.

Yarn: Plymouth Encore Worsted, 3 skeins Orange and 1 skein Dark Red Colorspun.  A bit of stashed white for accents.

Needles and Gauge: US sz. 7 / 4.5mm  yielding 4.5 sts per inch.

Mods: Many!  Before I started this I checked out all the projects on Ravelry and my impression was that the bog jacket is a rather tall/skinny garment.  Now, most children’s clothing nowadays has lots and lots of ease.  I tried to knit this Bog to be similar to a boy’s modern sweater shape – nice and wide, and very boxy.

So: That meant shortening everything and eliminating most of the shaping details EZ talks about. My magic CO number was 128 for a 28″ finished chest.  The original Bog would be 64 ridges to the armpit, mine is only 52 ridges.  The original would have 64 ridges over the shoulders, mine has only 50.    Sorry if that makes no sense, you have to be familiar with this design.

Additions: Pockets. Since this is knit back and forth I thought it would be fun to try pockets in Double Knitting. They are a bit flimsier than the rest of the sweater but very very low fuss to include them.

Hood: Pretty much the same as a Tomten hood- increase up the back, weave the top. As you can see above I made a very shallow V-neck to cozy the front of the hood around the face.

Sleeves: I picked up all the stitches at the cuffs and worked K2P2 ribbing until the yarn ran out.

Other Details: The white has a thin band of stockinette between 2 ridges.  The front garter band was picked up at the very end, 6 rows white, 3 ridges red and bind-off.  I inserted the zipper with the sewing machine, not worrying too much about hiding the seams, and it was ok.  Still wavy, despite how many pins I used.  Grr.

Verdict: I can’t believe how fast this was!! I would love to knit another someday – perhaps for me with all the shaping and other details.

Falling-in-love-itis

I’m not sure whether Yarn Harlot has yet identified this particular knitterly affliction, but I do know I’m afflicted.

Yesterday after finishing the Bog Jacket (pictures tomorrow) I was innocently cruising Ravelry and…

this incredibly cute sweater caught my eye.

Despite my professed sanity I called up my LYS asked if they had this booklet? and could they hold it? and I would be right down.

Oh my.

Oh my.

Now if you’ll excuse me, I have a date with an adorable little sweater.

Cheers!

FO: The Dinosaur Pullover

If you want to skip all this blather just check it out on Ravelry.

Recipient: Holdon – a good friend of my sons.

Pattern: Seamless Saddle Shoulder Pullover by Elizabeth Zimmermann, found in Knitting Workshop.

Dinosaurs: This inspired me, but after searching the internet fruitlessly for the pattern I ended up knitting off a photo of DharmaRN’s lovely pullover.

Yarn:  Knitpicks Wool of the Andes Worsted. Colors Forest Heather and Camel Heather, plus some random sock yarn for the hem.

Needles, Gauge, and Size: US sz. 4 needles / 3.5 mm, yielding 5.25 sts per inch, yielding a 31″ finished chest measurement.  I calculated target gauge based on the size of the chart and number of stitches needed to accommodate it.

Without question it was the fun details that made this sweater interesting to knit.  Just above the armpit join I began a steek to open the neck.  I cast-off 2 sts and the next round cast-on 7 at the hole.  Seven sts is a really nice number for making self-facing crochet steeks.

I cut the steek before starting on the collar so it could be knit back and forth. After knitting the lining of the collar I cast of the front and side sts leaving the back sts to stabilize the neck and to write the recipient’s name.  The lining is sewn down all around the collar edge, and the name piece was sewn down afterwards.

This is one of the self-faced steek edges. With 2 lines of crochet, the paranoia is minimal and the edges fold so nicely and neatly under. After the facing it tacked down inside you could never tell it’s there.  I used the same technique on the Three Cable Sweater, also with great results.

For the record, I do not like installing zippers.  They put their ugly edges over my nice tidy edges and I have trouble getting them to lay flat. Harumph.  But I do like the little stopper I made for this one:

To edge the front zipper area I tried using applied I-cord, but it wasn’t working out the way I wanted. So I picked up all the edge sts and then used the I-cord bind-off.  It worked out perfectly. The line of picked up sts under the I-cord was a perfect place the hide the main zipper seam. I’d use this technique again.

Verdict and Final Thoughts:  I hope he likes it!